I took some photos while felting the last few ruffle shawls. A few people have asked me, how to get the ruffles, so here is how I do this.
First, I lay out the center lengthwise, then the ruffle part around it with fibers going outwards. Thin, but many layers of fibers are best for a uniform result. No matter how you design the rest, the center part should be strong, so I usually press the fibers down with my hands carefully to feel for any weak spots (just looking at it might not be enough to judge, especially the black - the fibers are fluffy and can trick the eye).

Depending on how much fiber I have laid out for the ruffle part, the ruffle can be thick and firm or sheer and lacey, cobweb looking. I like both results, actually. This time I wanted a fairly firm, but not too thick ruffle. At this stage you should also decide how long do you want the ruffle to be. In this photo my ruffle only has one staple length, and it would have been rather short. I added a second layer later, but it was tricky to do since I did not want to mess up the rest of my design. So, if you want big ruffles, lay a second layer of wool going around the scarf again, overlapping fibers well.
The fun part :) I did not really like the green mix by itself too much, so I wanted to add other colors to bring a bit more contrast to it.I went with black and 2 shades of lilac
The darker lilac is barely there, just shadowing a little.
Then I added peaces of mawata silk hankies in some parts - I just cut them with scissors and stretched to fit the area that I wanted to cover.
 |
| I decided I wanted the ruffle to be wider, so added a second round of fiber around it - it was really tricky not to mess up the rest! Better to do that before laying out the design. |
Sprinkle with warm soapy water and roll. Unroll after each 100-125 rolls to check and change the direction. Once the scarf passes the 'pinch test', I usually unroll and felt the center of it by hand a little further. Work on the ruffles, shaping them gently the way that I want them to look. (Sorry, no photos from this part, but I got carried away and had soapy hands, too... :))
I fulled this scarf slightly, shocking the fibers with cold and hot water plus a few gentle throws - this wool felted very easy and I did not want to over-do it.
Rinse well. I usually put my scarves to rest in a light vinegar bath ( a couple spoons of white vinegar to a bowl of neutral t` water), then rinse well again and hang to dry. Once dry, the scarf should be ironed on wool settings, and sometimes I even use a little steam. Ironing makes a big difference.
Here is a photo of the finished scarf:
I actually like to toss one end of it over the shoulder, but I can't seam to find a photo showing it... The colors are a bit more green and less blue in real life - this was a cloudy day and no matter what I tried, they don't look right on my screen.
And here is another one. I love how this came out - a really dramatic effect! I had used a very fine 18.5 micron merino wool as a base and it is really really soft!
 |
| center fibers going lengthwise |
 |
| two staple-lengths of ruffle |
I used a very interesting fiber mix to decorate this scarf - the white fibers are linen, combined with black and bright red, the effect is rather amazing!
 |
| ruffle felt scarf layout before felting |
And here it is after felting:
 |
| Felt ruffle scarf black with red and white accents |
The black one is one of my favorites. I had some doubts when I was shopping for linen, but it was definitely worth trying out the unusual!

 The darker lilac is barely there, just shadowing a little.
 Then I added peaces of mawata silk hankies in some parts - I just cut them with scissors and stretched to fit the area that I wanted to cover.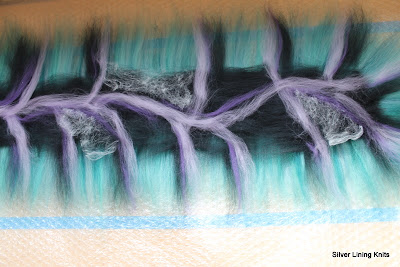
 I actually like to toss one end of it over the shoulder, but I can't seam to find a photo showing it... The colors are a bit more green and less blue in real life - this was a cloudy day and no matter what I tried, they don't look right on my screen.


 The black one is one of my favorites. I had some doubts when I was shopping for linen, but it was definitely worth trying out the unusual!


