Showing posts with label recipe. Show all posts

Sunday, December 16, 2012

Gingerbread cookies or "PIPARKUKAS"

gingerbread cookies, just out of the oven


Everybody LOVES these cookies! I have been bugged so many times to share the recipe... well here it is - finally! One fair warning though - these are one of those where you can't stop at one. I make this quantity at least twice for my family during the holiday season and still we always run out of them... :))


Ok, here's what you will need:
400 g honey
400 g sugar
~350 g butter
~1.2 kg flour (it can be a little more or less! That's the tricky part)
2 tea sp. of baking powder or soda

Spices:
2 tea sp. coriander
2 tea sp. clove (or 15 pcs)
2 tea sp. cinnamon
1 tea sp. nutmeg
1 tea sp. ginger
1,5 tea sp. black pepper
some dried orange peal

All of the spices should be finely ground, either get them that way, or grind them yourself. In any case - they should be fresh, so that you get 100% of the flavor! This mix will produce a nice, balanced taste. I often spice it up a bit more, increasing some of my favorite spices, you can experiment here to your own taste.

Here is how to do it:


First before first, sift the flour. You will definitely use at least a kilo, so I usually do that and then leave it close by to be able to add as much as I need. Mix in the baking powder or soda, whichever one you are using (I actually use soda for these cookies).

First, choose a really BIG pot. It will make things much easier. Put in the honey, half of the sugar, butter and spices. Put it on a slow heat.

 While it's heating up, get a pan. Kick the kids and the cats/dogs out of the kitchen for this one! Put the remaining sugar in it, and let it melt into a brown caramel (don't burn it too much though, this will happen fairly fast!).
200g sugar in a pan
sugar, melted into caramel


Have a half cup of hot water ready, and when the sugar is nice and brown, quickly add the water. This will create a small explosion of steam, so be careful. Stir the whole thing well until all of the sugar has melted and you have one nice caramel syrup.

The 'explosion' part, where I just added water

stir quickly until it all melts


Now, the honey-sugar-butter mix should have melted nicely together by now, releasing a wonderful aroma from all the spices you used in it. Pour the caramel syrup in the pot and slowly mix it with the rest. Let it pop a bubble before you take it off the heat.

looks a little funny, I know, but the aroma is amazing!!

Now the tricky part... Start adding flour, while stirring. Add it spoon by spoon until you can't stir it anymore, then take the whole thing out on a clean surface, sprinkled with some flour and add some more, while working the dough with your hands. It will be HOT, but I never said this is going to be easy... Your target is to get a dough that is easy to work with - like the one that kids play with, and it should not stick to your hands. The first few times I made these, I had put just a little too much flour and the cookies were a bit hard to make (still tasted great though), so I always remind myself to stop before the moment when I think I should just add one last little bit... As the dough cools, it will become a bit harder.

add flour

until you can't mix with the spoon anymore

this one still needs some flour and some work. It should be non-sticky and easy  to work with in the end.


Leave it on a big plate to cool. Roll it rather thin (!) and use cookie cutters to shape pretty cookies. Try to use similar size shapes for each pan, this way they will bake more even.

Bake them in 170`C on pastry program (air plus up and down heat), TIME how long it takes to bake each tray! They are ready real quick, as they have the caramelized sugar in them. Mine usually take 5:30 min to 6:00 minutes and once the timer goes off I drop all else and take them out immediately. If they get burned, they'll be bitter.

That really is it. Let them cool on the pan before you take them off and once they are completely cool store in air tight containers, so they remain crisp. Once cool, these can be decorated with icing - lots of fun! :)

Enjoy!

Monday, July 16, 2012

Chocolate ice cream recipe

Home made chocolate ice cream
Slightly melted, but we have
43`C here today...
I just made it and it is one of the best chocolate ice creams I have had... seriously! So I thought I'd share.

* I came up with this as I was reading a collection of ice cream recipes that I have. I wanted a chocolate one, but I wanted it to be really rich and creamy - none of the ones I had seamed to be that way.... so here's what I did...


This is just the perfect amount for Krups ice cream maker - that's the one I have.

What I used:

250 ml full fat milk
250 g sweet cream 35%
100 g sugar
3 egg yolks (keep the whites for macaroons ;))
100g of dark chocolate, in little 'chips' although anything that's in little peaces would work


What I did:

Put the milk to heat slowly (don't boil it!) and beat egg yolks with sugar til they are white and creamy with no more sugar visible. Slowly add hot milk to it while stirring it in continuously. Then put the mixture back into pot and slowly heat to 85`C. (Use kitchen thermometer! If you go past this temperature, the ice cream won't be nice.) Mix in chocolate and stir until it's completely melted. After that, empty the mixture in a container that will be easy to later store in refrigerator and let it cool. Then stir in sweet cream and place it in refrigerator for at least 12 hours. After that, put it in your ice cream maker! It took me about 30-ish minutes to freeze. That's it!

Wednesday, June 8, 2011

Really really yummy!

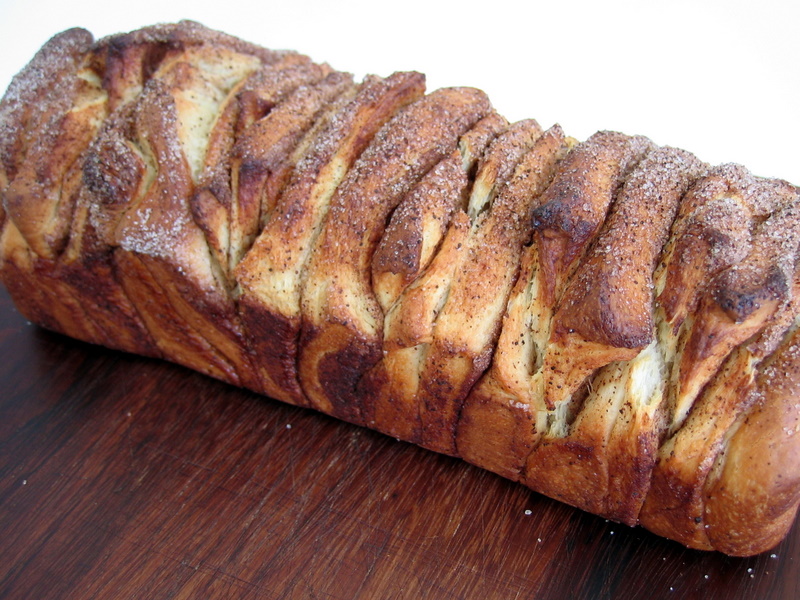
Cinnamon Sugar bread
Once upon a time while browsing the world wide web, I stumbled upon a recipe... And what recipe it was! I instantly bookmarked it for future use, but, instead of forgetting all about it soon afterwards, this one kept bugging me... until I finally gave in. Beware, you might follow the same destiny, so unless you are free from calorie counting, don't read a word further! And definitely do NOT look here - that's the original recipe, with plenty of how-to photos, I sort of forgot to snap a pic at the cutting dough part (which was a little bit tricky, read on to find out why).
BUT, while I really wanted to eat it, I really did not have the time/mood to make the dough myself. When both kids are home and one is sick, and you still have a million things to do before you can sit down, it sometimes happens. So, this is my Lazy version of the Cinnamon Sugar Pull-Apart Bread, using a recipe from my bread maker as a base. It's really similar to the one on the cooking site, and I will definitely try it next time, but when you just want to put all things in and forget about it till the dough is ready, this is a pretty good variation, too.

Ingredients for the dough (based on Izzy bread maker recipe for croissant):

1 egg
225ml milk
60g butter ( I used the real thing - totally worth it! but you can replace it with margarine)
1 tea spoon of salt
2 table spoons and a bit of sugar
400g flour
3/4 pack of dry yeast - about 7g or ~ 1,5 tea spoons
vanilla - I used 2 of those little tubes of vanilla powder

Ingredients for filling:

sugar to taste
cinnamon - plenty
butter for spreading it over dough, melted
nutmeg - just a bit - optional

So, in my lazy version, I combined all ingredients in my bread maker (I always whisk the egg a little bit). Wet ingredients go in first (butter needs to be melted), last is flour with vanilla and yeast. Start the dough making program, clean up the kitchen and you're free till the timer beeps. I have Izzy bread maker, and it takes 1 1/2 hours till the dough is ready.

Once the dough is ready, take it out, sprinkle some flour on your work space first, so it won't stick, and roll it out in an approximate rectangle as much as it will go. Spread the melted butter over the dough, then add sugar and cinnamon. I have learned that in order for it to be really tasty, it needs quite a bit of sugar, so be generous. The original recipe mentions a whole cup, I have not measured mine, I believe it's less though, but you get the idea. Be generous with cinnamon. I had not added nutmeg, but if you like it, add a little bit of that, too, just for the aroma.
plenty of cinnamon and sugar!

Grease a loaf/cake pan (mine is 30x11cm) with butter. Slice your rolled dough into ~8-9cm wide strips, then slice these in smaller peaces, about 5-6 cm wide. You get a rectangle. Now the tricky part.You need to put these rectangles one on top of the other. The sugar and cinnamon will want to fall down, which is why I found it easier to lift smaller peaces rather than long strips of soft dough, as the original recipe suggests. Place 3-4 peaces one on top of the other and then start stacking them in the pan. They don't have to be perfectly straight, and don't try to push them too close - the dough will raise more. Once you are done, cover it with a towel and start pre-heating the oven.

place all rectangles in the baking pan


I baked mine in 200`C (392`F) for some 20-ish minutes, the original recipe suggests 350`F (176C) and 30-35 minutes. I used the pastry program of my oven, with upper + lower heat + air.

just out the oven, I wish I could transfer to You the aroma!


That really is it! I absolutely love it. The cinnamon bread is fantastic, perfect with a glass of milk, tea or coffee. But besides that, the smell of the freshly baked bread, yeast, cinnamon all over the house... it just smells like happiness.